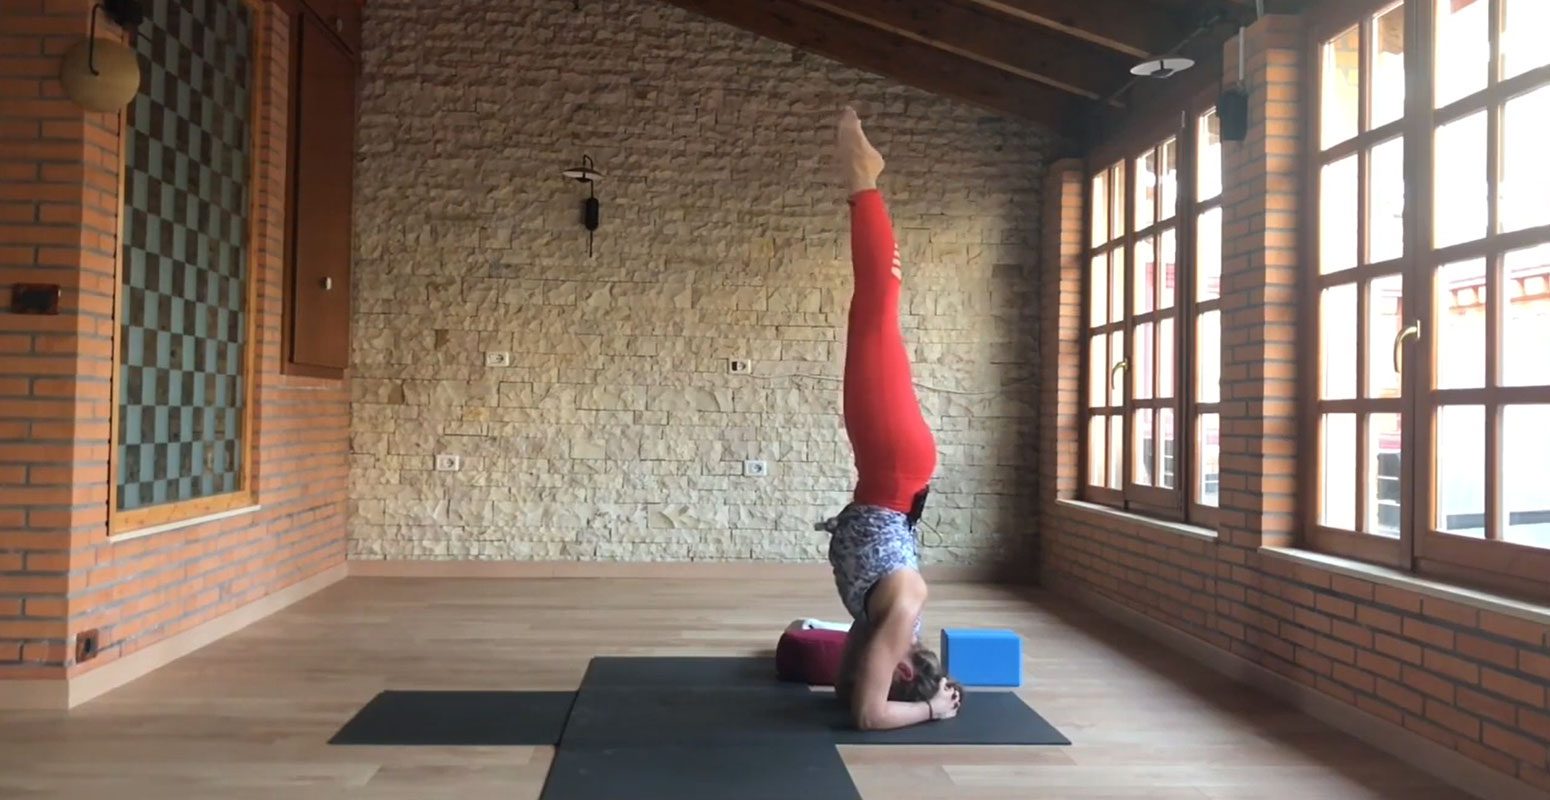
Headstand, or Sirsasana, is an intermediate pose practiced in yoga.
Headstand, or Sirsasana, is an intermediate pose practiced in yoga. Usually you find it towards the end of the practice, but you could also do a headstand in the middle of the practice (maybe for 5-7 breaths) or at the very beginning of the class when you practice Hatha Sivananda.
In this position, the body is totally inverted, with the head on the floor and the feet in the air. Some people find it fun to practice inverted poses, while others feel it's a bit scary due to the fear of falling down and injuring themselves.
Before you go any further
The Mental Block
Before we get into the practical instructions required for this pose, it’s worth taking a moment to explore the feelings that come with attempting a headstand, such as fear.
Maybe you had an overprotective parent who was constantly telling you, ‘Don’t climb that fence because you’ll fall off that ladder or you’ll break your neck!’ ‘Don’t do that! Don’t go there!’ So on and so forth If this is the case, then your body has stored these experiences and it’s the mental fear that is stopping you from trying a headstand, despite the fact that your physical body could be ready to do it.
Over the years, our fears grow deep within us and we are conditioned to internalize this way of thinking. We try to protect ourselves by not doing anything related to fun because it’s dangerous. We simply stay in our comfort zone. Yoga requires us to take many different positions with our body and through these positions, we see our physical and mental limitations, and slowly through the practice, we conquer them and grow. The poses become therapeutic, allowing us to also conquer our mental blocks and fears.
Back to our headstand now….
Do you want to deepen your yoga practice?
Let’s make this clear right from the start: Headstand is not for beginners
Now the question is: who is considered a beginner?
A beginner is someone who practices yoga irregularly, who needs to rest in a child’s pose after a few poses, makes no progress, and mainly has no flexibility or strength from previous sports/hobbies. If you have been practicing ballet for 10 years, you will have a lot of flexibility and you may find some poses easier than others. You might be a beginner in yoga but you already have the flexibility to try more advanced poses. If you are new to yoga with no other background in sports, then it’s advisable to obtain a regular yoga practice (4 times a week for 2 years at least) and then try more challenging yoga asanas.
An advanced beginner in yoga, on the other hand, is one who:
- practices regularly (4-5 times a week)
- doesn’t need to rest in child’s pose in a beginner’s practice
- has good and steady breath during a flowing yoga practice (doesn’t run out of breath)
- knows alignment and modifications for the poses
Headstand requires flexibility in:
hamstrings (the muscles at the back of your legs). Prepare your body with Prasarita, Padangusthasana, half split, pyramid pose.
shoulders. Prepare them with half cow-face posture, eagle arms, Prasarita C arms, dolphin pose keeping the gaze on the belly button.
Headstand requires strength in:
the shoulders. Prepare yourself with dolphin dips. Abdominal muscles, prepare with boat pose back muscles, prepare the body with high plank and chaturanga dandasana.
How to make the most of this post
- Read everything
- Watch everything
- Practice everything mentioned under the title “So how do you do a headstand”
Do you want to become a yoga teacher ? Or significantly improve your yoga skills ?
How to set up the correct foundation for headstand
In yoga speak, ‘foundation’ refers to the part of the body which is in contact with the floor. In this case, it’s the lower arms and the top of the head. However, most of the weight should be on the arms and not the head. You need to imagine that someone wants to pass a piece of paper underneath your head when you are in the headstand.
- From a table-top position, place your arms on the floor. You want your upper arms to be parallel to each other and the elbows to be under the shoulders, not wider. In order to do this, when you wrap your arms, the knuckles of your hands need to be outside of your triceps.
- Without moving your arms, interlace your fingers. Make sure that one pinky finger is tucked under the other pinky finger. In other words, don’t place the little fingers on top of each other. (see the 2 photos inserted in the video below) If they are on top of each other, then all your weight will be on 1 pinky finger and that’s gonna hurt - a lot. Once you place your hands on the floor and you look at your interlaced palms, you should be able see one pinky finger. All of it.
- Press the forearms down onto the floor so that they don’t roll out. This is a necessary grounding action which needs to stay like this while you are in the pose. Don’t change the foundation.
- Place the highest and flattest point of the head on the floor inside your palms. You can find this point by placing a book on your head and see where it balances. (My grandmother used to make me walk with a book on my head so as to perfect my posture)
- Most of the weight has to be on the hands and not on the head. That’s why you have to press through the arms a lot and even imagine that you want to lift the head.
Proportions: the length of the upper arms in relation to the length of the neck & head
Go in front of a mirror, interlace the fingers and bring the hands over the head. Keep the elbows in the same line as the shoulders and don’t lift the shoulders towards the ears. Keep some space between the shoulders and the ears. What do you notice? Are your upper arms longer than the length of your neck + head together or are they shorter? If your upper arms are longer, then you’re good to go. If the upper arms are shorter, then you need to do one of the following:
- Either place blankets under your arms when you set up for the headstand. This will give you extra space for the neck, as long as your neck is off the blankets. Place the neck on the mat, not on the blankets. Rachel Berryman, who is the main teacher in our 300-hour yoga teacher training, demonstrates this in the video below:
- or When you interlace the hands, close the palms together so that the wrists are joined This will make the elbows come closer to one another and will give you a few more centimeters of height.
Another way to find out what your proportions is from dolphin pose. When you take a dolphin position, your head should be off the yoga mat. Rachel shows this in the video below at minute 4:25.
Are headstands healthy? 6 contraindications that you need to watch out for before attempting a headstand
- Neck pain, neck sensitivity, disk herniation, forward neck or kyphosis or flat cervical spine. If you suffer from any of these, work on backbends to “correct” the position of the spine as much as possible. Tips: Keep the computer at eye level when you work. Keep the chin parallel to the floor when you walk, instead of looking down like you’ve lost something. ??♀️ Walk with a book on top of your head (in the house) ?
- Thyroid issues which are not regulated by pills - if so check with your doctor
- High blood pressure which is not regulated by pills - if so check with your doctor
- Pregnancy - this depends on the person’s experience with yoga before getting pregnant. Some pregnant women who used to do headstand before can still do headstand when they are expecting. In some cases, when the baby does not take the position which is appropriate, a headstand is even recommended because it can help the fetus invert and therefore take the correct position.
- Menstruation, especially in the first days when the flow is heavy.
- Glaucoma or eye surgery
Practice tip to strengthen the neck muscles: lie down on the floor on your back and lift the head just 2 mm off the ground. The less you lift the head from the floor, the harder it is. Hold this position for 5 seconds and do it 4-5 times. If you do this for a whole week, your neck will be much stronger.
Difference between (bound) headstand and tripod headstand
The main difference between the above-mentioned headstands is that the neck carries more weight in the tripod headstand. In the bound headstand, most of the weight is on the hands and you can even lift the head a few millimeters off the ground. (you need to be strong for this version, don’t try this if you are new to headstands) As a beginner practitioner to headstand, you should get familiar with bound headstand first and then the tripod headstand and other variations as well, because there are quite a few versions of this pose in yoga.
So how do you do a headstand?
Preparations and limitations you might meet on your way to headstand
- Prepare yourself with sun salutations
- Take 10 breaths in dolphin pose
- Take 10 dolphin push-ups
- Warm up the neck
- Child’s pose squeezing a block between the hands
- From dolphin position, bring one knee to chest and keep one foot on the ground. Do this for at least 5 breaths on both legs. Don’t know how long a breath is? Then take 5 seconds. Do not skip this step!
- Bring one knee to chest and keep one foot on the ground. Bring the weight of this leg onto the toe by moving the hips further forward than the shoulders. If it doesn’t happen, don’t worry, support that leg on the tip toes only. Hold for 5 breaths on both legs. Minute 08:26 in the video below. This step in also super important as it build CORE.
- Bring both knees to chest for 5-10 breaths. This is super challenging and shows if you have the core strength. Do not skip this one either, have patience here and you will see progress long term.
- If you are more advanced, try to lift both legs off the ground at the same time and while they are straight. Again, you need to move the hips further forward than the shoulders so that the legs become light and lift off the floor. Minute 12:07
- Take child’s pose for at least 10 deep breaths to neutralize the blood pressure
- Practice, practice practice
Are headstands good for you? Yes and no
Like all poses, there are benefits and contraindications. The benefits of practicing Sirsasana are:
- Strengthens the whole body (but is also requires initial strength)
- Purifies the blood, heart, lungs
- Develops awareness of the center of the body
- Helps overcome fears
- Builds confidence
- Puts things in perspective
- Improves blood circulation. The blood which contains oxygen and nutrients for the cells, flows towards all the organs of the body when you are inverted. It also goes to the digestive system, therefore helping with digestion.
- Reduces stress. When the blood flows to the brain, it releases hormones which immediately improve your mood.
How long should I stay in a headstand?
When you’re new to this pose, stay for 5-7 breaths and then come down. With practice and confidence, you can stay for 15-25 breaths. In Ashtanga Yoga headstand is practiced for at least 15 breaths in A variation, (bound headstand) 10 breaths in B variation (both legs parallel to the floor) and 10 breaths in C variation (lifting the head).
Sometimes you might come across a tripod headstand in a yoga class where the teacher asks you to stay for only 5 breaths. Or you could go up in a tripod headstand only to take an arm balance from there. Always take a child's pose after a headstand. I also like Uttanasana after doing a headstand, especially after a tripod headstand + arm balance in a Vinyasa class. In this kind of setting, the teacher might not give you time to do a child's pose, so lengthening the neck in a standing forward fold feels really good.
This article is written by Joanna (lead teacher of the 200 hour yoga teacher training) and the videos are created by Rachel Berryman, who is the lead teacher in the 300 hour yoga teacher training.
Thank you so much Rachel for the amazing videos, all of which are part of our 200 hour online yoga teacher training
Please share this article so that we can educate more people about this pose.
Love and light,
Joanna
? ? ?
9 Important Things to Know Before Choosing the right Yoga Teacher Training Course... for you (Point 4 will really surprise you).